How To Layer Micro Hugelkultur In Raised Beds: A Step-By-Step Guide
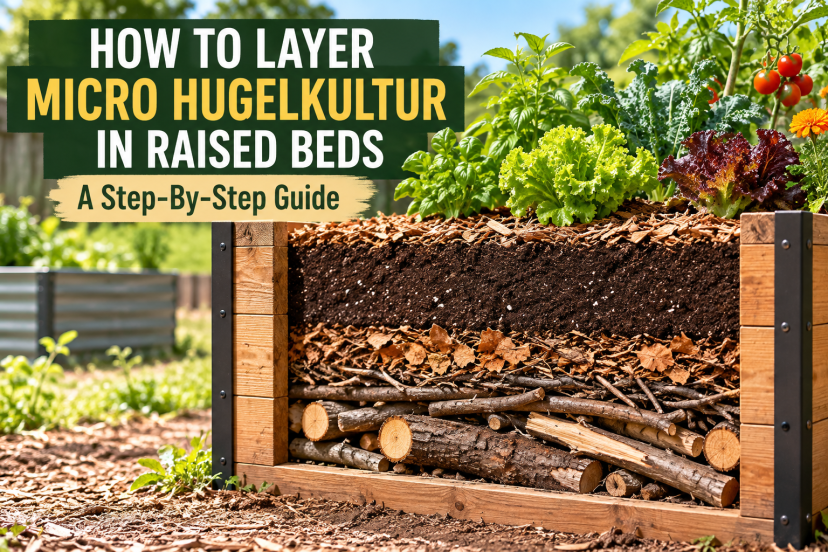
Keep Large Pieces Of Wood Below the Main Root Zone
The most important rule is to keep large pieces of wood below the main root zone. A raised bed filled mostly with logs may save money on soil initially, but it can settle unevenly, create air pockets, and provide less usable growing space.
Micro hugelkultur adapts traditional hugelkultur techniques to smaller raised beds, including 4-by-4-foot wooden beds and compact galvanized metal planters. This guide explains how to build the layers, choose suitable materials, and avoid common problems.
Quick Answer – The Best Way To Layer Micro Hugelkultur
For a raised bed approximately 18–24 inches deep, a practical micro hugelkultur arrangement is:
-
Bottom layer: Small untreated logs and branches.
-
Gap-filling layer: Twigs, shredded leaves, and other suitable organic matter.
-
Transition layer: Finished compost mixed with soil.
-
Top growing layer: Approximately 10–12 inches of suitable planting soil, or more when growing deeper-rooted crops.
These are practical starting dimensions, not scientifically established universal ratios. Shallow beds generally benefit from using less wood and more soil.
Micro Hugelkultur Layering Checklist
| Layer | Suggested Material | Main Purpose |
|---|---|---|
| Bottom | Small untreated logs, branches | Reuse woody material and gradually add organic matter |
| Gap filling | Twigs, shredded dry leaves | Reduce large voids between logs |
| Transition | Finished compost and soil | Create a gradual transition into the root zone |
| Growing layer | Quality raised-bed soil | Support root development, nutrients, and drainage |
| Surface | Shredded leaves or clean organic mulch | Limit evaporation and protect the soil surface |
The exact thickness of each layer should depend on the bed’s depth, the crops being grown, and how much settling you can tolerate.
How Micro Hugelkultur Works In Small Raised Beds
Traditional hugelkultur uses buried or mounded woody material that gradually decomposes beneath growing plants.
Micro hugelkultur follows the same general idea but uses smaller pieces of wood and a shallower organic layer to fit compact garden beds.
As the wood decomposes, fungi and other soil organisms gradually break it down. Over time, the woody material contributes organic matter to the surrounding soil.

However, there are important limitations.
Wood Decomposition Takes Time
Large hardwood logs can remain intact for years. Smaller branches and partially decomposed wood generally break down faster, although the rate depends on moisture, temperature, wood species, and soil conditions.
This means a new micro hugelkultur bed should not be treated as a ready-made source of plant nutrients.
Woody Materials Can Temporarily Affect Nitrogen Availability
Wood contains substantial carbon relative to nitrogen.
When soil microorganisms decompose carbon-rich material, they may temporarily immobilize nitrogen, particularly where fine woody particles are mixed directly into the growing soil.
Keeping large wood pieces beneath a generous layer of fertile soil helps reduce this concern.
Water Retention Is Not Guaranteed
Decomposing wood can hold moisture, but freshly buried wood does not automatically make a raised bed drought-resistant.
Large air gaps, poor soil contact, and inadequate watering can leave a new bed drying unevenly.

Think of micro hugelkultur as a method of reusing organic materials and gradually improving the bed—not as a replacement for good soil, compost, mulch, and appropriate irrigation.
Step-By-Step: How To Layer Micro Hugelkultur In Raised Beds
Step 1 – Prepare The Raised Bed
Begin with a stable, level raised bed.
For a typical 4-by-4-foot bed, check that the frame is securely assembled and that excess water can drain freely.
If the bed sits directly on healthy garden soil, leaving the bottom open allows soil organisms and some plant roots to move between the raised bed and the ground.
Before adding materials:
-
Remove debris: Clear away trash, construction waste, and unsuitable materials.
-
Check drainage: Make sure water cannot collect inside a sealed container.
-
Inspect the frame: Repair loose boards, sharp metal edges, or unstable corners.
-
Control weeds: Remove persistent weeds and roots where practical.
-
Protect utilities: Check for underground lines before digging or installing stakes.
For metal raised beds, avoid packing wood tightly against thin panels where it could cause deformation.
Step 2 – Place Small Logs And Branches At The Bottom
The bottom layer contains the largest woody material.
Choose untreated, uncontaminated wood from known sources. Pieces approximately 1–3 inches in diameter are manageable for many small raised beds.
Larger pieces can be used in deeper beds, but they occupy more growing space and may increase settling.
Arrange the pieces horizontally, with smaller branches filling the spaces between larger pieces.
For an 18–24-inch-deep bed, a modest woody layer around 3–6 inches thick is a reasonable starting design. This is a construction example, not a tested optimal depth.
Avoid building a dense stack that prevents soil from filling the gaps.

Step 3 – Fill The Gaps With Twigs And Shredded Leaves
Next, fill the spaces between logs with smaller organic materials.
Suitable options include:
-
Small twigs: Fit between larger branches and reduce open spaces.
-
Shredded leaves: Provide carbon-rich organic matter.
-
Partially decomposed wood: Offers material already undergoing decomposition.
-
Small amounts of mature compost: Help fill spaces and improve contact between materials.
Add soil or compost into the gaps rather than creating a thick, loose layer of leaves.
Whole leaves can form compacted mats when wet, especially if they are piled densely.
Lightly moisten the materials as you work. They should be damp enough to encourage decomposition without becoming waterlogged.
Step 4 – Add A Compost And Soil Transition Layer
Cover the woody material with a mixture of finished compost and suitable garden soil.
A transition layer of approximately 2–3 inches can help fill remaining gaps, although the ideal thickness depends on the bed design.
Use mature compost that smells earthy rather than sour or strongly ammoniacal.

Do not rely on unfinished compost as the main growing medium.
This layer serves several purposes:
-
Helps separate large woody materials from the growing zone.
-
Fills voids that might otherwise cause uneven settling.
-
Adds organic matter to the soil profile.
-
Supports a more consistent root environment.
Gently settle the mixture around the branches without heavily compacting it.
Step 5 – Add The Main Growing Soil
The upper layer is the most important part of the entire raised bed.
For many annual vegetables, aim for approximately 10–12 inches of quality growing medium above the buried wood, with additional depth for crops that need it.
Choose a raised-bed soil blend suited to your plants, with adequate mineral soil, stable organic matter, drainage, and nutrient availability.
Avoid filling the entire upper section with pure compost.
A healthy growing layer matters more than the quantity of buried wood.

If the bed is only 12 inches tall, consider using very little buried wood—or skipping the woody layer entirely.
Step 6 – Water The Bed And Allow Initial Settling
Water the filled bed thoroughly enough to moisten the growing medium.

Watch for areas where the soil suddenly sinks. These depressions may indicate large spaces around buried branches.
Add more growing soil to low areas.
Allow the bed to settle briefly before planting, but remember that woody materials will continue decomposing and the soil level may decline over subsequent seasons.
Step 7 – Apply Mulch And Plant Your Crops
Finish with a suitable organic mulch.
For many vegetable beds, approximately 1–2 inches of shredded leaves or another appropriate mulch can help limit surface evaporation. Keep mulch away from plant stems.
Then plant according to the crop’s spacing and depth requirements.
Shallow-rooted leafy vegetables can be practical choices for a new bed with limited growing depth.
Deep-rooted vegetables require a deeper, unobstructed soil zone.
Example: Layering A 4×4-Foot Raised Bed
Here is an illustrative layout for a 24-inch-deep raised bed.
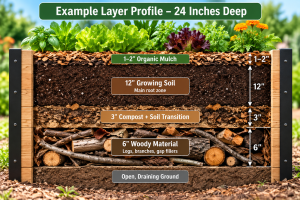
Example Layer Profile — 24 Inches Deep
1–2″ Organic Mulch
12″ Growing Soil
Main root zone
3″ Compost + Soil Transition
6″ Woody Material
Logs, branches, gap fillers
Open, Draining Ground
Illustrative proportions only. The layers total approximately 22–23 inches, leaving room for watering and settling. Actual layer depths should be adjusted for crops and bed conditions.
A 4×4-foot bed has 16 square feet of surface area. Each inch of depth represents approximately 1.33 cubic feet of material.
| Layer | Depth | Approximate Volume |
|---|---|---|
| Woody material | 6 inches | 8 cu. ft. |
| Compost and soil | 3 inches | 4 cu. ft. |
| Growing soil | 12 inches | 16 cu. ft. |
| Mulch | 1–2 inches | 1.3–2.7 cu. ft. |
These volumes describe the space occupied by each layer, not exact purchasing quantities. Wood leaves irregular voids, and loose materials settle.
Which Wood Is Best For Micro Hugelkultur?
The best choice is generally untreated, uncontaminated wood that is available locally and safe to introduce into a food-growing bed.

| Material | Suitability | Important Consideration |
|---|---|---|
| Untreated hardwood branches | Good | May decompose slowly |
| Partially rotted untreated logs | Good | Inspect for contamination |
| Small untreated twigs | Good | Useful for filling gaps |
| Clean shredded leaves | Good | Mix with other materials to avoid matting |
| Pressure-treated lumber scraps | Avoid | Treatment and contamination concerns |
| Painted or stained wood | Avoid | Unknown coatings |
| Railroad ties | Avoid | Potential hazardous preservatives |
| Diseased plant material | Use caution | Risk depends on disease and plant material |
| Wood from unknown industrial sources | Avoid | Potential contamination |
Wood species also matter.
Some naturally rot-resistant species can persist much longer than others. Walnut wood deserves additional consideration because certain walnut tissues contain juglone, which can affect sensitive plants.
When the wood source is uncertain, use a conventional soil-and-compost raised bed instead.
Common Micro Hugelkultur Mistakes And How To Avoid Them
1. Using Too Much Wood
Filling half a shallow raised bed with logs leaves insufficient space for vegetable roots.
Better approach: Reserve most of the bed depth for growing soil.
2. Leaving Large Air Pockets
Large spaces between branches can lead to uneven settling and inconsistent moisture.
Better approach: Fill gaps with smaller organic materials, compost, and soil.
3. Mixing Fresh Wood Chips Into The Root Zone
Fine, carbon-rich wood particles can increase nitrogen immobilization when incorporated into soil.
Better approach: Keep most woody materials beneath the main growing layer, and use finished compost in the root zone.
4. Using Contaminated Wood
Old construction lumber may contain preservatives, paint, or other unwanted substances.

Better approach: Use untreated wood from a known source.
5. Assuming The Bed Will Never Need Watering
A woody core does not guarantee reliable moisture availability, particularly during the first growing season.
Better approach: Check soil moisture regularly and water according to plant needs.
Better Alternatives For Shallow Raised Beds
Micro hugelkultur is not necessarily the best method for every garden.
For beds around 6–12 inches deep, conventional raised-bed soil may be more reliable because there is little room for buried wood beneath the root zone.
Other practical options include using finished compost to improve existing soil, applying surface mulch, or building a deeper bed when suitable.
For renters and gardeners using elevated planters with solid bottoms, use a container-growing mix and ensure adequate drainage. Do not assume that a buried log layer can substitute for proper drainage.
Maintenance And Long-Term Results
During the first growing season, monitor the bed for soil settling, uneven moisture, and plant nutrient deficiencies.
Top up growing soil when necessary, and use fertilizer based on crop needs and soil testing rather than assuming decomposing wood will supply adequate nutrients.
Over the following seasons, buried wood will gradually break down. The rate varies considerably, so avoid promising a fixed decomposition timeline or specific water savings.
Replenish surface mulch and compost as needed. If the bed sinks noticeably, add suitable soil before the next planting cycle.
Frequently Asked Questions
Can I Use Fresh Logs In A Micro Hugelkultur Raised Bed?
Yes, untreated fresh logs can be used beneath a sufficient growing layer. However, they may decompose slowly and can contribute to settling as they break down. Avoid mixing large amounts of fresh sawdust or fine wood chips into the root zone, where nitrogen immobilization may become more significant.
How Deep Should A Raised Bed Be For Micro Hugelkultur?
A bed approximately 18–24 inches deep provides more flexibility for a modest woody layer beneath a useful growing zone. Shallower beds can sometimes accommodate small twigs, but a conventional soil-filled bed is often more practical. The required depth ultimately depends on the plants and underlying soil.
Does Micro Hugelkultur Reduce Watering?
It may help manage moisture as buried wood decomposes, but dependable water savings are not guaranteed. Results depend on soil texture, wood condition, climate, bed construction, mulch, and irrigation. Newly constructed beds still require regular moisture checks, especially during hot or dry weather.
Related Guides And Next Steps
- Micro-Hugelkultur For Raised Beds (Pillar Hub)
- Best Wood For Micro Hugelkultur Raised Beds
- Micro Hugelkultur In Metal Raised Beds
- Why Hugelkultur Raised Beds Sink Over Time
Final Thoughts
Learning how to layer micro hugelkultur in raised beds is primarily about balancing buried woody material with enough quality growing soil.
Start with small, clean, untreated branches at the bottom, fill the gaps carefully, add mature compost and soil, and protect the upper root zone from excessive settling.
For a compact raised bed, using less wood and maintaining more growing depth is often the safer starting point.
Micro hugelkultur can be a useful way to recycle suitable yard materials, but long-term success still depends on soil quality, crop selection, drainage, and consistent maintenance.
Explore more: